To begin, navigate to the top left-hand corner of your AutoFlow system, and click on Create Notification. This will bring up the following window.

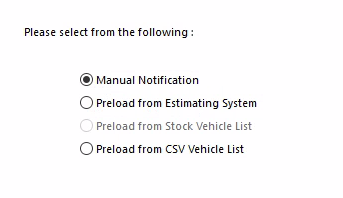
From here you will select how you would like to create a job in the system.
- Manual Notification
- Preload from Estimating System
- Preload from Stock Vehicle List
- Preload from CSV Vehicle List
- Preload from CSV Notification
Select one of the options and click Next in the bottom right of the window.
Manual Notification
Sometimes you will be required to manually create notifications, such as private and retail work.
Work Provider and Vehicle Details
The next window is where you will input the Work Provider and Vehicle Details.
All information highlighted in red is mandatory and you will not be able to progress to the next stage without it.

After you have filled in all the necessary information, you can proceed to the next screen by clicking on the Next button.
Additional Information
This page is specifically for inputting any insurance claim details that you may have. If you have this information available, you can enter it now.
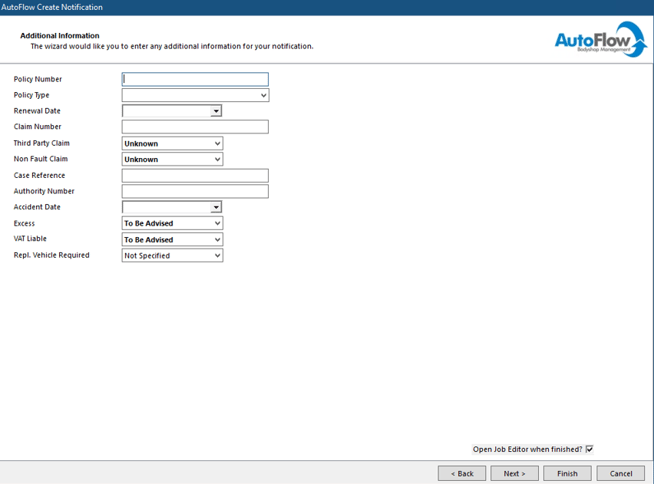
After you have filled in all the necessary information, you can proceed to the next screen by clicking on the Next button.
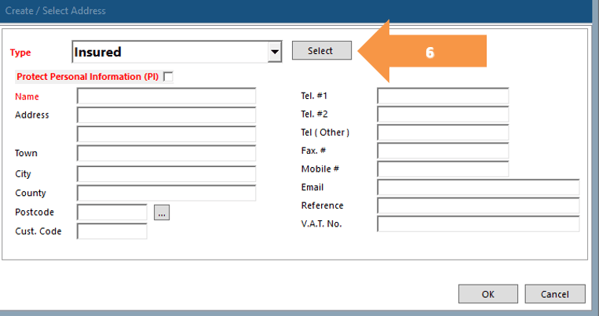
Address Details
This page is for inputting any address details that you may have. If you have this information available, you can enter it now. Any addresses that are linked to the registration of the vehicle will show here if they've already been in your system. To add an address, press the Create button.
When selecting an address type a Select button will show. This will allow you to choose from your system.
If you're missing an address, these can be added in by one of your admin users. Find the article here.
Progress through the next page selecting OK.
Further information can be added here for each of the contacts on the job.
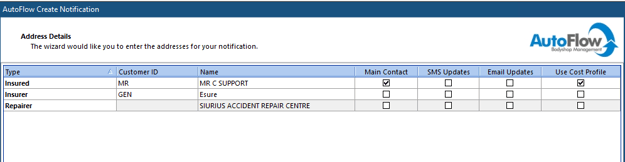
Select Next to progress.
Notification Circumstances and Damage
Include any further information for the notification.
After you have filled in all the necessary information, you can proceed to the next screen by clicking on the Next button.
Notification Instructions
Include any further information for the notification.
By checking the box that says "Open Job Editor when finished," the AutoFlow system will automatically open the Job Edit module when you click on Finish. From there, you can easily get in touch with the customer to schedule an estimate appointment.
After you have filled in all the necessary information, you can proceed to the next screen by clicking on the Finish button.
Preload from estimating system
You can import estimates into AutoFlow from the following estimating platforms:
- Audatex
- GT Motive
- CheckMate
- Cabas
This will require you to go through the same steps as a manual notification but will populate the relevant boxes with the information from the estimating system. Your estimating system should be linked with AutoFlow. Once you have selected the estimating system, this will take you through to a list of jobs.
Estimate Importer
Input the relevant information for the job here and ensure that all of the other information is correct and matches the job.
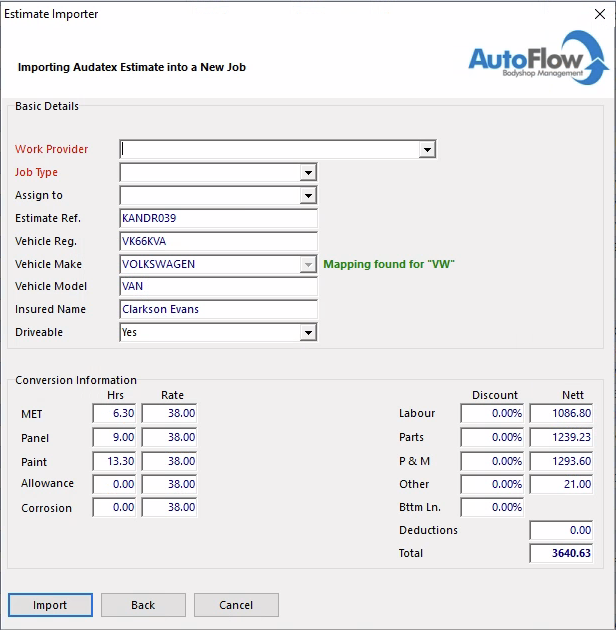
Select Import to progress.
The system will check to see if there are any associated jobs on the system matching the registration. It will notify you at this stage if there are.
Select who produced the estimate.
Highlight the cost profile to be used for the job and press Use Selected. The job will now be imported into the system.